Debugging Microbit v2.21 with OpenOCD
This year I was tasked with helping students at my university with programming with BBC Microbit v2.21. Microbit is a powerful embedded platform introduced and developed by the BBC as an initiative to get kids interested in coding and computer science at an early age. Hilarious at it is, the way we use them at our university is to introduce students to bare-metal programming in embedded C. We want to bypass all the fancy fuss (python, Scratch and MakeCode) and program the on-board nRF52833 SoC directly. This is usually done by flashing the Microbit with J-Link OB; an on-board version of J-Link which allows us to flash and debug the chip with ease. Unluckily for us, the chip shortage has affected the Microbit as well (no supply exceptions for kids!). Therefore, BBC got creative and replaced the Freescale KL27 interface-chip with a Nordic nRF52833/nRF52820, which again means the J-Link OB used for previous version (v2.20) is no longer suitable for our Microbit. This is where I had to get creative.
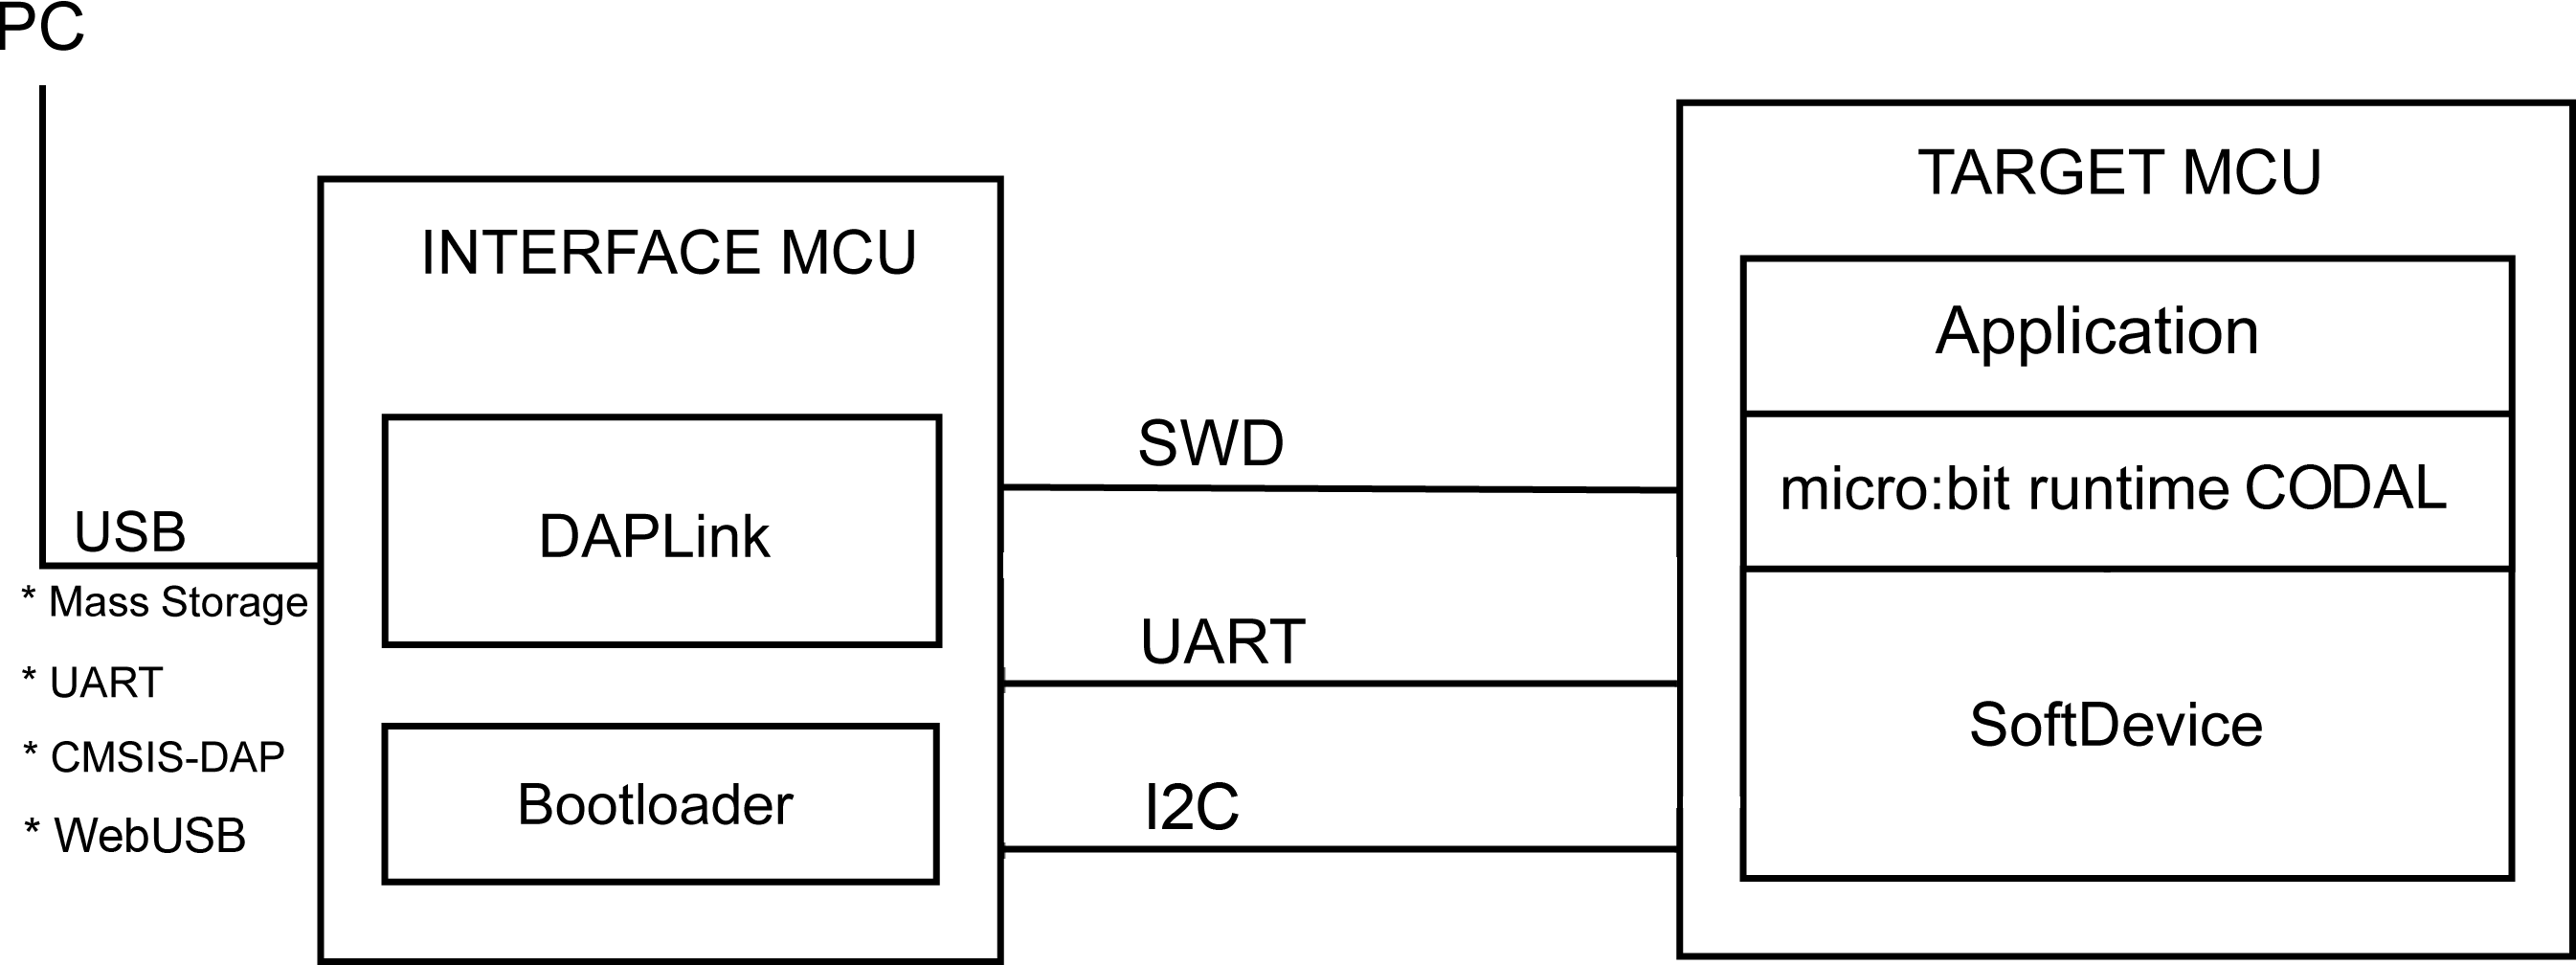
Ok. So what are we working with? The Microbit has to MCUs: an interface MCU nRF52833/nRF52820 (talks to target MCU and PC) and a target MCU nRF52833 SoC (where our code runs). The DAPLink firmware that’s running on the interface MCU is an interface firmware designed to enumerate as a USB composite device, and create a way for us to talk with the target MCUs debug. This is what allows us to drag-n-drop our code to it just as if it were a USB stick. It supports UART (for serial communication), WebUSB (for python, MakeCode etc.) and CMSIS-DAP (huh?). A quick google search gave this answer from the ARM mbed handbook.
CMSIS-DAP provides a standardized way to access the Coresight Debug Access Port (DAP) of an ARM Cortex microcontroller via USB. CMSIS-DAP is generally implemented as an on-board interface chip, providing direct USB connection from a development board to a debugger running on a host computer on one side, and over JTAG (Joint Test Action Group) or SWD (Serial Wire Debug) to the target device to access the Coresight DAP on the other.
A lead! So we need to find some piece of software that supports this type of interface. This blogpost by Flames of Code describes just the tool we need: OpenOCD. Open On-Chip Debugger or OpenOCD “has been created by Dominic Rath as part of a diploma thesis at the University of Applied Sciences, FH-Augsburg.” It supports CMSIS-DAP AND GDB, and has lots of other cool features, but most importantly: it’s open source <3. What remains now is to install and configure OpenOCD for our Interface MCU, and write the necessary VSCode configuration files (yes, not all students use neovim).
brew install openocd
or
sudo apt install openocd
Since we use nRF52, we’ll add that to our configuration:
openocd -f interface/cmsis-dap.cfg -f target/nrf52.cfg

Open On-Chip Debugger 0.12.0
Licensed under GNU GPL v2
For bug reports, read

http://openocd.org/doc/doxygen/bugs.html

Info : auto-selecting first available session transport "swd". To override use 'transport select <transport>'.
Info : Listening on port 6666 for tcl connections
Info : Listening on port 4444 for telnet connections
Info : Using CMSIS-DAPv2 interface with VID:PID=0x0d28:0x0204, serial=990636020005282052fdf8ce885275e1000000006e052820
Info : CMSIS-DAP: SWD supported
Info : CMSIS-DAP: Atomic commands supported
Info : CMSIS-DAP: Test domain timer supported
Info : CMSIS-DAP: FW Version = 2.1.0
Info : CMSIS-DAP: Serial# = 990636020005282052fdf8ce885275e1000000006e052820
Info : CMSIS-DAP: Interface Initialised (SWD)
Info : SWCLK/TCK = 1 SWDIO/TMS = 1 TDI = 0 TDO = 0 nTRST = 0 nRESET = 0
Info : CMSIS-DAP: Interface ready
Info : clock speed 1000 kHz
Info : SWD DPIDR 0x2ba01477
Info : [nrf52.cpu] Cortex-M4 r0p1 processor detected
Info : [nrf52.cpu] target has 6 breakpoints, 4 watchpoints
Info : starting gdb server for nrf52.cpu on 3333
Info : Listening on port 3333 for gdb connections
Brilliant! As expected, OpenOCD connects to our Microbit over CMSIS-DAP. We can see that our Target MCU supports 6 breakpoints and 4 watchpoints. We can also see that it starts a telnet, tcl and gdb server.
Now we can connect it to a GDB-server, or in this case configure VSCode.
Using VSCode
For VSCode you can chose if you want to use OpenOCD or pyOCD. I chose pyOCD, but both work. PyOCD has the added benefit that it has some useful commands (like load and erase) that make it easy to load your binaries to the bootloader. It’s also listed as one of the supported tools by arm DAPLink.
pip3 install pyocd
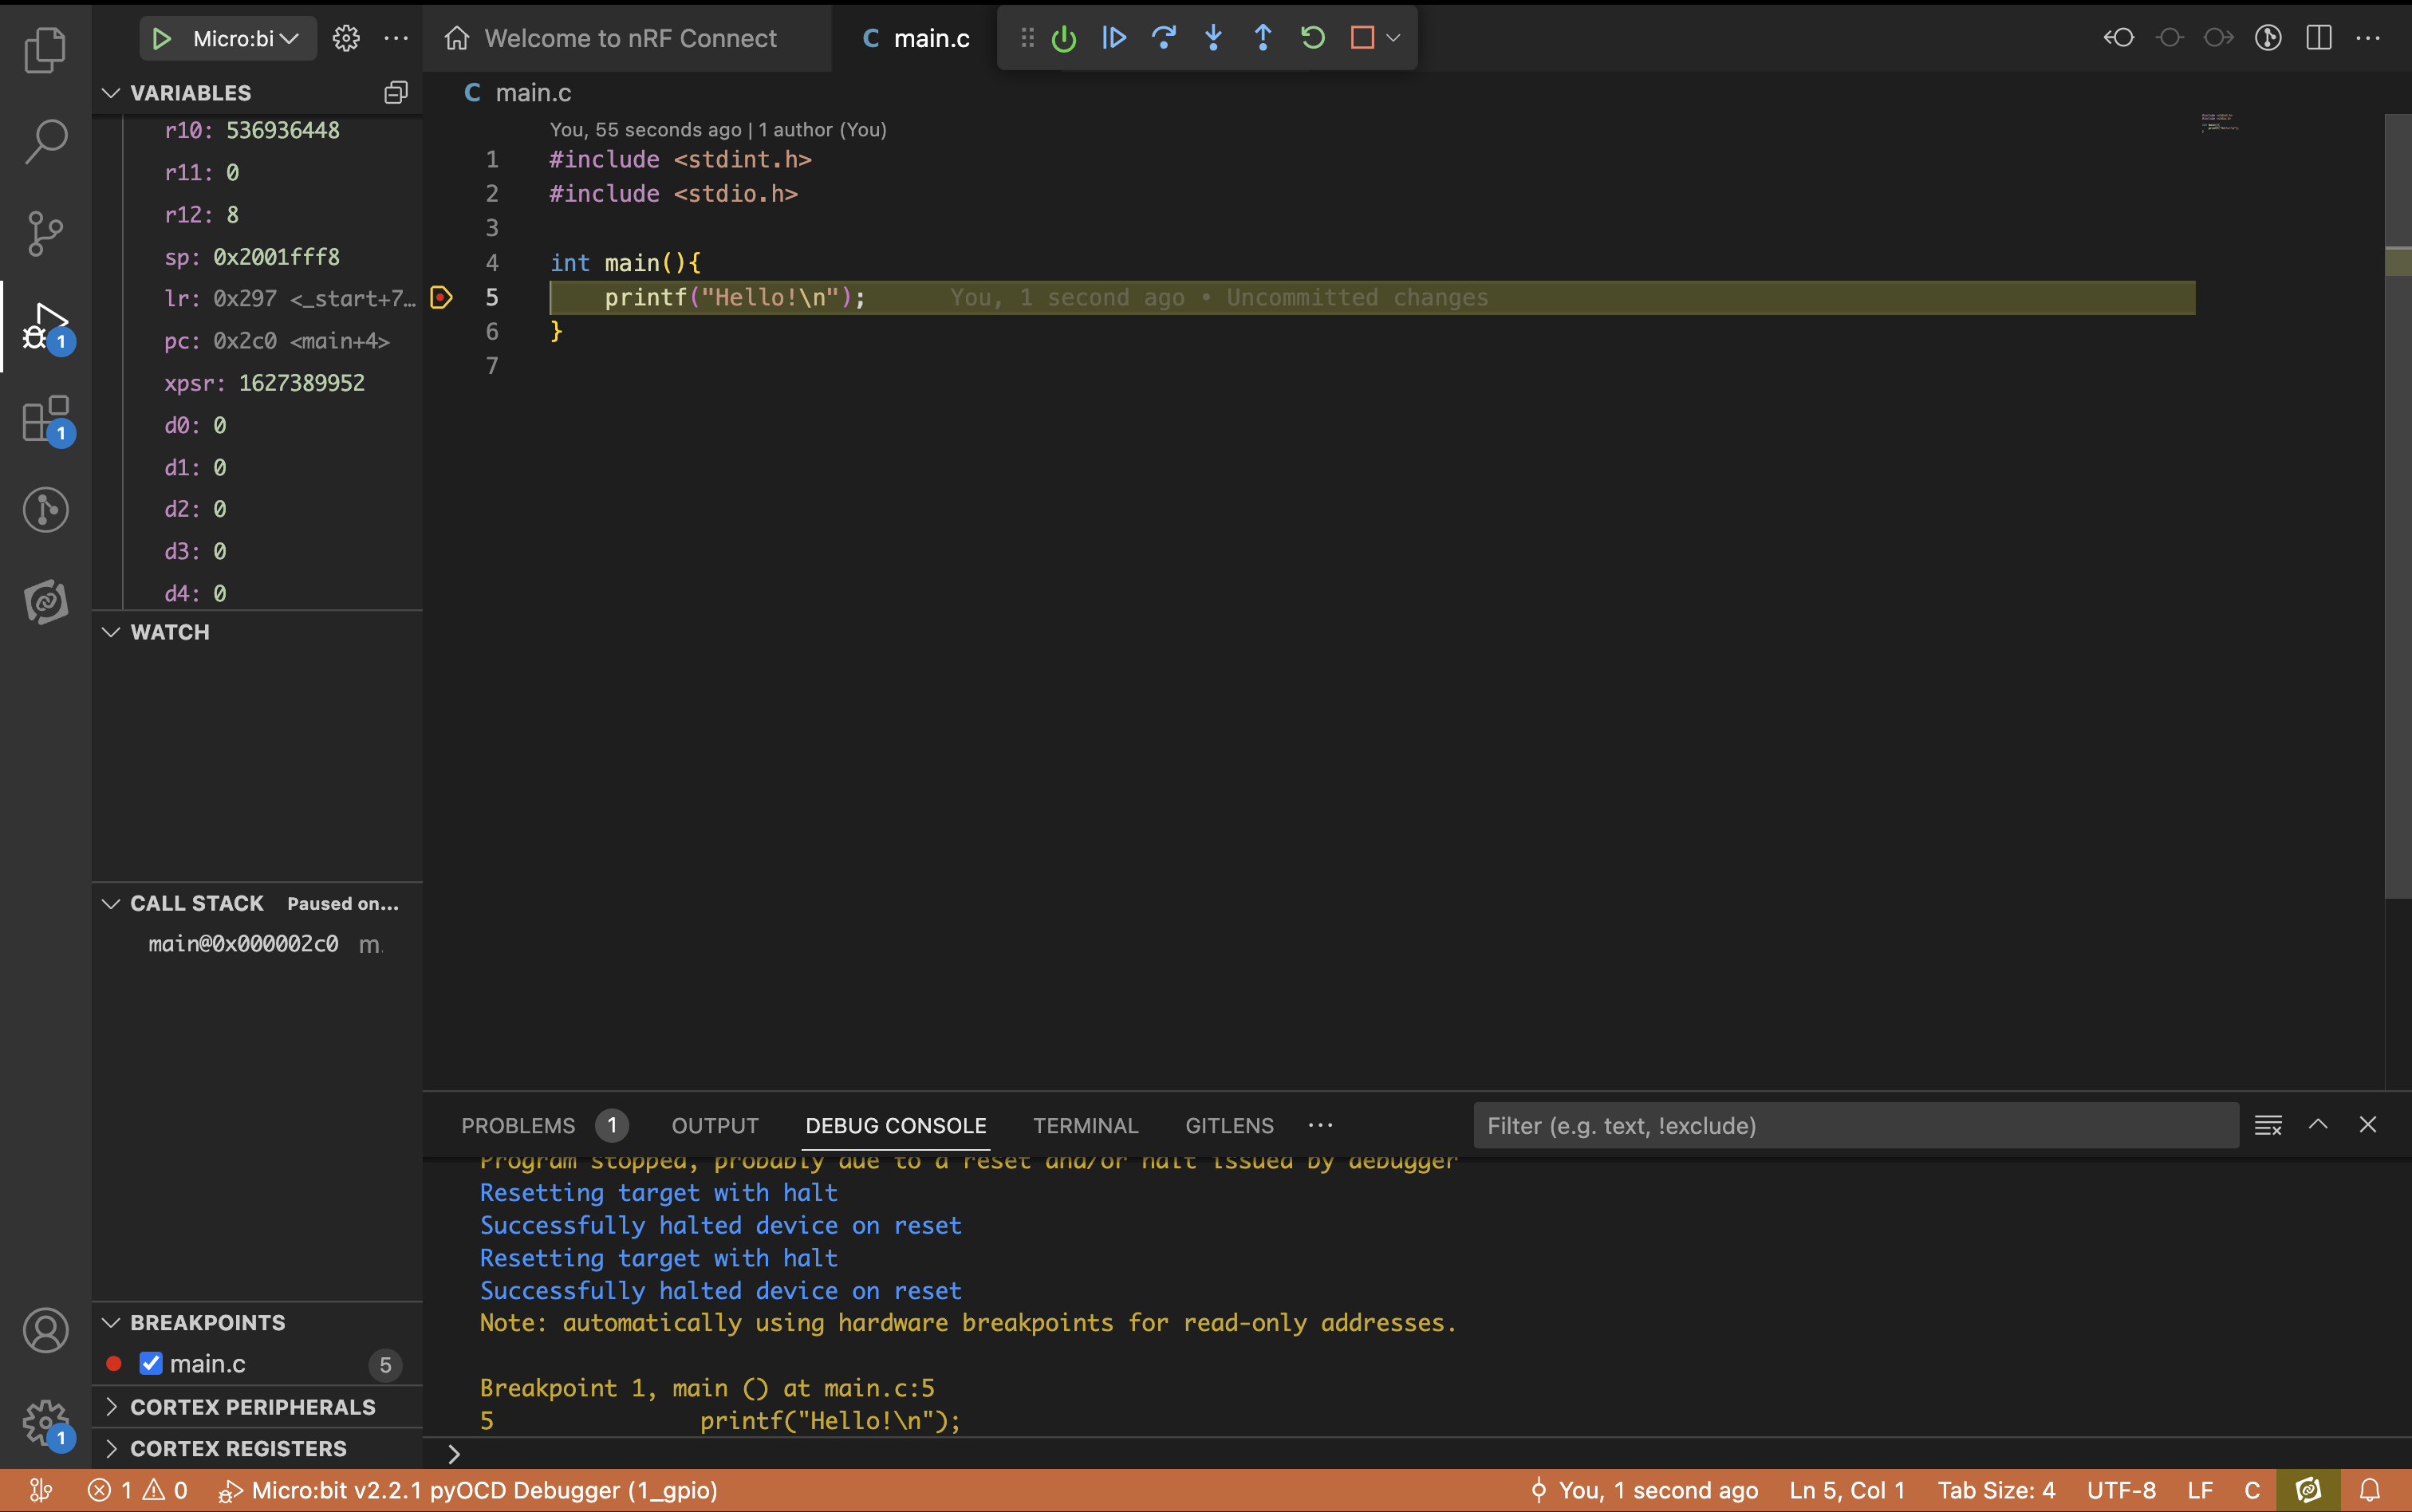
To debug the Microbit in VSCode you need an extra extension: Cortex-Debug. This plugin will launch pyocd and GDB at the same time, and will make it possible to view all the register values of our target MCU. Make sure to replace the absolute path variables before using the config listed below. gcc-arm-none-eabi is required, and some systems (Ubuntu) you need arm-none-eabi-gdb to debug the arm architecture.
{
    "version": "0.2.0",
    "configurations": [
        {
            "name": "Micro:bit v2.2.1 pyOCD Debugger",
            "cwd": "${workspaceRoot}",
            "executable": "./path/to/build_system/main.elf",
            "request": "launch",
            "type": "cortex-debug",
            "runToEntryPoint": "main",
            "servertype": "pyocd",
            "configFiles": [
                "interface/cmsis-dap.cfg",
                "target/nrf52.cfg"
            ],
            // MacOS
            "armToolchainPath": "/opt/homebrew/bin/",
            // Ubuntu
            //"armToolchainPath": "/opt/arm-none-eabi-12.2/bin/",
        "preLaunchTask": "build"
        }
    ]
}
(if you get any errors, you best bet is to download the GNU arm toolchain manually, and not via a package manager such as apt and homebrew)
Testing with a single breakpoint gives us full control of our Microchip, including registers like PC: